
Yes! I have succumbed to the wanton pleasures of the flesh! Get your mind out of the gutter right now! The vice that I speak of is none other than....FALSIES!! Omg! I love love love false eyelahes! I used to think getting them on was some totally complicated process, oh boy was I wrong! Putting them on is sooo easy, I love it!

Catogorized as a cosmetic accessory, false eyelashes, according to makeup.lovetoknow.com were invented by American movie director D.W. Griffith in 1916. He wanted his leading lady to have long lashes that graced her cheeks whenever she looked down thoughtfully. Thus the first pair of fabulous falsie were created using human hair and gauze!

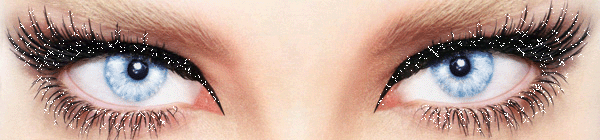
There are two types of false eyelashes most commonly used, strip eyelashes which can give natural yet dramatic look and individuals which can be tailored to suit the needs of the look being achieved. Strips are definitely quicker and easier to apply and can turn a blah face into a glam face. Indivduals on the other hand are more like weave strips for the hair, they can be added to give body to the lashes while maintaining the natural look of the clients lashes. Individuals can also take the face from blah to glam but with a little extra effort and some serious application technique.
I first ventured into the world of falsies this past Carnival. Even though I didnt play mas I was adamant that I would put together a banging makeup look for the road and it had to include lashes. So I armed myself with all the knowledge that youtube tutorials had to offer, preparing some three weeks in advance for just how spectacular I wanted it to be! (the look is featured in my photos in the sidebar) The experience was daunting to say the least. But after all the preparation I was not going to fail! So I grabbed my Wonderful World $15.00 lashes with my $10.00 mini glue and got to work, here's how you do it:
1. Your first step to false eyelash application is taken long before the glue dries. You first have to select the type of lashes you would like to use and the desired look you would like to achieve. Alot of the time individuals with smaller facial features like myself may have to purchase regular lashes and tailor them to suit, by trimming them. Be sure however, to trim from the outer lashes i.e the longest hairs on the strip.
2. Have everything ready. Be sure to have your tools handy before you begin, these may include a tweezer, scissors for trimming and a small flat container for placing glue.
3. Remove the strips from the packing carefully. Most strips and individuals come lightly glued to their packaging in order to keep their shape.
4. Shape the lashes. For strip lashes it is important to manipulate them to the shape of the eyes. To do this it is recommended that you hold the lash at both ends and bend it in the shape of a horse shoe. Also st this time the lash is measured against the eye and cut to the desired length.
5. The glue is then applied to the strip. It is recommended that a small amoount of glue be placed on a clean, flat, smooth surface so that it is easily accesible. The strip is then dipped gently in the glue making sure glue is applied to both ends of the strip.
6. Wait! Ok now you wait till the glue dries a little. Wait till it gets a little tacky or sticky, then you know its ready to be applied.
7. Ready, Aim, Fire. Ok now the lash is ready for application, take your time line it up right and stick! You want to get the falsies as close as possible to your natural lashes so you're sticking them at your lash line just where you apply your eyeliner. Its a good idea to actually apply some eyeliner before putting on the lashes so that any spaces can be camoflaged.
8. Lastly apply some mascara to your falsies. The small brush of the mascara wand should gently comb out the strands and also mesh your natural lash with the falsies.
For individual eyelash application you follow the same steps. You shouldn't need to trim them because they come in different lengths. The only real difference is where they are applied which is under your lashes, close to you upper lid waterline, instead of above. Oh and they require one more tool....PATIENCE! lol!
Whoo! I know it looks like a lot eight whole steps but I promise you, with the proper tools and the some practice it won't take you as long as it took me to write this post!
Happy stickin'!

♥Dramah